Building on our previous setup of Caddy as Webproxy to your #homelab resources most likely you will be now in the situation where you end up in two sets of sites/services that you want to make available to the internet.
Public service - deemed as completely public, al content is to be visible and searchable through the internet some examples of this may be, a static website, your blog, a public RSS viewer, etc. Anything that you feel comfortable on trusting to be completely public.
Private service - deemed as available to the internet, but either the data, functionality or even the use case is deemed as something restricted to just you or a specific set of users.
In this scenario, you are bound to trust the application that you are hosting and exposing in terms of who can access/see/use the #selfhosted application.
Caddy Server does have basic_auth capabilities, this means that you can add a basic HARD CODED user name and password for any exposed endpoint. This is good enough for a very basic authentication schema, but is not necessarily good enough considering a multi-users scenario.
On the other hand, Caddy Server is flexible enough to add extensions to it and increase its capabilities. With our target of enabling a multi user environment that is non complex like setting up Authelia or other SSO solution, we will be leveraging extra features to provide these capabilities.
The Stack: What You’ll Use
Tailscale – For secure mesh networking between your VPS and LAN machines. Optional: Any VPN solution that enable you have access
Caddy Server – A modern web server that handles automatic HTTPS and reverse proxying.
A VPS – A simple, external node that acts as your gateway. Recommendation: Only Debian — no Ubuntu here thank you very much.
go language - Language used to write the Caddy Server and plugins
Git - Version control system to get latest code and enable modified version
xcaddy - Official go language based caddy binary builder
Architecture Overview

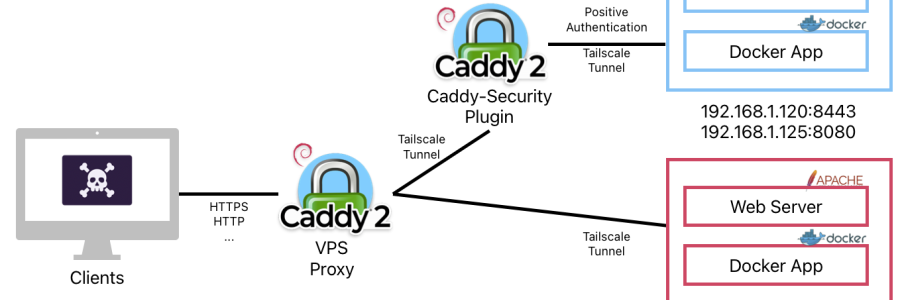
#scenario 1 - Non Auth Service
[Client] → https://yourdomain.com → [VPS + Caddy] → Tailscale Tunnel → [Your LAN service]

#scenario 1 - Auth Service
[Client] → https://yourdomain.com → [VPS + Caddy] → [Caddy-Security Auth] → Tailscale Tunnel → [Your LAN service]
Expected outcomes, Password Correct, access granted, Password Wrong, access denied
Step-by-Step Guide
I. VPS Setup Enable your Debian VPS to build Caddy binaries.
GIT Install - xcaddy requires GIT installed in your VPS to pull latest version of the caddy plugins.
$ sudo apt install git -yStock version in Debian 12 is good for this project
Go Language Install - Follow install instructions published in the [https://go.dev/doc/install) website.
Recommended steps:
DO NOT use the Debian 12 version in the repositories, as of the write of this post, version in repositories is 1.19, xcaddy requires 1.2+
$ sudo rm -rf /usr/local/go
$ sudo tar -C /usr/local -xzf go1.24.5.linux-amd64.tar.gz
.profile setup, create an sh script in /etc/profile.d/01-name-file.sh contents of the file should be:
#!/bin/sh
export PATH=$PATH:/usr/local/go/bin
Once you log out and log in go lang will be available on your VPS
$ go version
go version go1.24.5 linux/amd64
xcaddy Install - Follow the install instructions published in their GitHub repository.
Recommended steps:
$ sudo apt install -y debian-keyring debian-archive-keyring apt-transport-https
$ curl -1sLf 'https://dl.cloudsmith.io/public/caddy/xcaddy/gpg.key' | sudo gpg --dearmor -o /usr/share/keyrings/caddy-xcaddy-archive-keyring.gpg
$ curl -1sLf 'https://dl.cloudsmith.io/public/caddy/xcaddy/debian.deb.txt' | sudo tee /etc/apt/sources.list.d/caddy-xcaddy.list
$ sudo apt update
$ sudo apt install xcaddy
This concludes the setup of the tooling, by now, your VPS is capable of building custom Caddy server versions.
Custom Caddy Binary Build
Create your new Caddy Server binary with your chosen extensions.
Create a working directory in your $HOME Invoke xcaddy with the arguments for caddy-security extension
$ xcaddy build --with github.com/greenpau/caddy-securitynote: you can add as many extensions you prefer, they are published in their directory.
Enable Debian Package Support to quickly swap the version you want to run, the stock one, or your modified one.
$ sudo dpkg-divert --divert /usr/bin/caddy.default --rename /usr/bin/caddy
$ sudo mv ./caddy /usr/bin/caddy.custom
$ sudo update-alternatives --install /usr/bin/caddy caddy /usr/bin/caddy.default 10
$ sudo update-alternatives --install /usr/bin/caddy caddy /usr/bin/caddy.custom 50
$ sudo systemctl restart caddy

# To change the running binary behind your Caddy installation:

$ update-alternatives --config caddy
Note: To keep your Caddy custom version up to date in future, instead of updating through apt, you will update it using
$ sudo caddy upgradeThis command will pull the latest base version, and compile your local custom one with the latest and greatest both from Caddy and the Extensions you embedded.
Caddy Configuration
By now, your Caddy server runs with the extension of AuthCrunch (caddy-security). In their documentation, Paul Greenberg outlines the different use cases and deep configuration. For the sake of this guide, we will narrow down the use case on the local authorization, which still enables you to have a multi-user environment, but with simple integration.
Create the folder where you will store the local user base. /etc/caddy/auth/local
Note: You do not need to create the users.json file, this will be created by Caddy upon first run and then you can modify it.
Update your Caddyfile as this example:
{
    # Caddy directives to user authorization before reverse proxying
    order authenticate before respond
    order authorize before reverse_proxy
    # Configuration of the Local configuration
    # users.json will be created on first run, make sure path exists
    security {
        local identity store localdb {
            realm local
            path /etc/caddy/auth/local/users.json
        }
        #Setting up your Authentication Portal
        authentication portal myportal {
            enable identity store localdb
            cookie lifetime 86400 # 24 hours time to live
            cookie domain foo.com
            # Auth Portal UI configuration, adding links to some common features or other Authentication base application, visible when logged in
            ui {
                links {
                    "Application one" https://one.foo.com/ icon "las la-star"
                    "My Identity" "/whoami" icon "las la-user"
                }
            }
            transform user {
                match email admin@foo.com
                action add role authp/user
                ui link "Portal Settings" /settings icon "las la-cog"
            }
        }
        # Enablement of your Auth portal
        authorization policy admin_policy {
            set auth url https://auth.foo.com
            allow roles authp/user
        }
    }
}

# [ .... all your other Caddy configs/sites .... ]

# Auth Site
auth.foo.com {
    authenticate with myportal
}

# Your behind the Authentication site(s) you can add more and just make them authorize with admin_policy as first directive
one.foo.com {
    authorize with admin_policy
    reverse_proxy 192.168.1.125:8080 # Application service URL in your homelab
}
whilst in /etc/caddy you can use caddy itself to validate your Caddyfile
$ caddy validate Caddyfile
Once everything is up and running, you can go ahead and restart your caddy service
$ sudo systemctl restart caddy
note: If caddy service does not restart, check the permissions for /etc/caddy/auth/local/users.json is 664.
Hash your password using bcrypt, your can use an online converter such as this
Modify /etc/caddy/auth/local/users.json to have your admin@foo.com account
{
  "version": "1.1.7",
  "policy": {
    "password": {
      "keep_versions": 10,
      "min_length": 8,
      "max_length": 128,
      "require_uppercase": false,
      "require_lowercase": false,
      "require_number": false,
      "require_non_alpha_numeric": false,
      "block_reuse": false,
      "block_password_change": false
    },
    "user": {
      "min_length": 3,
      "max_length": 50,
      "allow_non_alpha_numeric": false,
      "allow_uppercase": false
    }
  },
  "revision": 3,
  "last_modified": "2025-07-29T02:25:01.685391413Z",
  "users": [
    {
      "id": "d65aac0f-98d6-4e5e-be88-4024fb6a3482",
      "username": "admin",
      "email_address": {
        "address": "admin@foo.com",
        "domain": "foo.com"
      },
      "email_addresses": [
        {
          "address": "admin@foo.com",
          "domain": "foo.com"
        }
      ],
      "passwords": [
        {
          "purpose": "generic",
          "algorithm": "bcrypt",
          "hash": <STRINGWITHHASHEDPASSWORDINBCRYPT>,
          "cost": 10,
          "expired_at": "0001-01-01T00:00:00Z",
          "created_at": "2025-07-29T02:14:50.923069716Z",
          "disabled_at": "0001-01-01T00:00:00Z"
        }
      ],
      "created": "2025-07-29T02:14:50.923069074Z",
      "last_modified": "2025-07-29T02:14:50.994872031Z",
      "roles": [
        {
          "name": "admin",
          "organization": "authp"
        }
      ]
    },
    {
      <MODIFY OTHER USERS....>
}
Conclusion
This how-to enables secure, repeatable authorization layer to your #homelab services without exposing your LAN to the internet and without adding additional infrastructure to support, relying only on tools that do one thing and do it well.