In the current age of remote access and #self-hosting, one of the most tempting solutions is to expose your local services directly to the internet — but that usually comes at a cost: security, complexity, and peace of mind.
While opening ports and configuring dynamic DNS might feel like the "quick win," it introduces unnecessary attack surfaces to your home network. There is a different way, One that I personally prefer as it is simple, effective and secure.
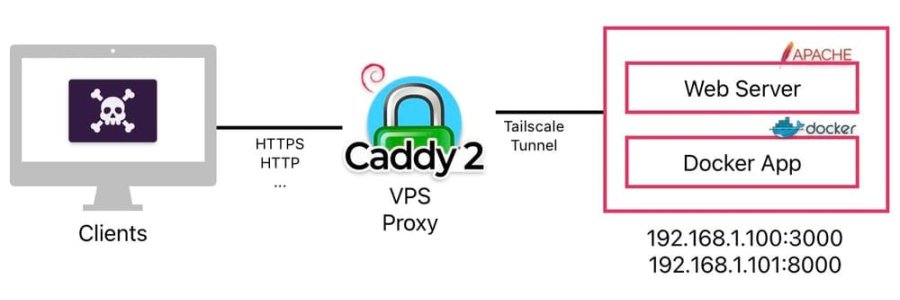
By combining a minimal VPS, Caddy as a reverse web proxy, and Tailscale as the secure mesh layer between your external node and your LAN, you can enable access to your self-hosted services with zero ports exposed, fine-grained access control, and surprisingly low complexity and support upkeep.
Why not expose your LAN servers directly to the Internet?
Let’s start here. Hosting a personal dashboard, wiki, media player or any other #selfhosted solution? Exposing them directly to the internet means:
- Dealing with NATs, port forwarding, and routers that may or may not support hairpinning.
- Needing external TLS termination and certificate renewal.
- Being vulnerable to bots, scans, or brute-force attacks.
- Constantly worrying about “what if I forgot to secure that one container?”
The alternative? Keep all your services inside your LAN, and only allow access through a trusted and controlled tunnel.
The Stack: What You’ll Use
Tailscale – For secure mesh networking between your VPS and LAN machines. Caddy Server – A modern web server that handles automatic HTTPS and reverse proxying. A VPS – A simple, external node that acts as your gateway.
Recommendation: Only Debian — no Ubuntu here thank you very much.
Why These (Not Self-Hosted)
You might ask: “If I'm into self-hosting, why rely on a VPS or external tools like Tailscale or Caddy?”
It’s a fair question — and the answer lies in choosing the right battles.
Tailscale Tailscale builds a secure, peer-to-peer mesh VPN using WireGuard. It handles key exchange, NAT traversal, IP allocation, and device discovery — without requiring a central VPN server or manual config. It works everywhere, including CGNAT environments, and can easily scale from 2 devices to 200+.
Caddy Unlike nginx or Apache, Caddy is built with HTTPS by default — zero effort TLS provisioning and renewal using Let’s Encrypt. Its configuration syntax is intuitive, and it supports modern features like automatic reverse proxying, basic auth, and even Docker-aware plugins. For small setups, it’s everything you need and nothing you don’t.
VPS You only need one small VPS — ideally located geographically close to your home — to act as your reverse proxy gateway. This node connects to your LAN over Tailscale, handles inbound HTTPS requests with Caddy, and relays them securely to your internal services. No need for port forwarding or dynamic DNS on your home router.
Why Debian? We choose Debian over other distributions for a reason: it follows a strict free software philosophy, it’s community-governed, stable, and transparent. Unlike Ubuntu, which often introduces proprietary blobs, Snap packages, and telemetry by default, Debian aligns with the self-hosting and privacy-first ethos. It's our preferred base for any #homelab or infrastructure node.
Architecture Overview

[Client] → https://yourdomain.com → [VPS + Caddy] → Tailscale Tunnel → [Your LAN service]The VPS becomes the only entrypoint to your services. It’s connected to your home network via Tailscale, and acts as a forward-only relay to just the services you want.
Step-by-Step Guide
Set up Tailscale on your LAN Devices
Install Tailscale on your home server(s): (simplified way, check the official documents)
curl -fsSL https://tailscale.com/install.sh | sh
sudo tailscale up
Once online, label them for easier identification.
Set up Tailscale on your VPS
Same install process: (simplified way, check the official documents)
curl -fsSL https://tailscale.com/install.sh | sh
sudo tailscale up --ssh
You don’t need to enable “exit node” — the VPS is just a controlled relay.
Configure Access Control Rules (ACLs)
Visit Tailscale Admin ACLs and restrict the VPS to only talk to specific IPs/ports in your LAN:
{
  "ACLs": [
    {
      "Action": "accept",
      "Users": ["autogroup:admin"],
      "Sources": ["vps-tailnet-ip"],
      "Destinations": ["192.168.1.100:3000", "192.168.1.101:8000"]
    }
  ]
}
This ensures the VPS can only talk to your defined services.
Install & Configure Caddy on the VPS
Install Caddy on Debian:
sudo apt install -y debian-keyring debian-archive-keyring apt-transport-https
curl -1sLf 'https://dl.cloudsmith.io/public/caddy/stable/gpg.key' | sudo tee /etc/apt/trusted.gpg.d/caddy.gpg > /dev/null
curl -1sLf 'https://dl.cloudsmith.io/public/caddy/stable/debian.deb.txt' | sudo tee /etc/apt/sources.list.d/caddy-stable.list
sudo apt update
sudo apt install caddy
Then, create a Caddyfile to proxy requests to the LAN via Tailscale:
/etc/caddy/Caddyfile
service.yourdomain.com {
    reverse_proxy 100.101.102.103:3000  # Tailscale IP of LAN host
}
Reload Caddy:
sudo systemctl reload caddyOptional: Add Basic Auth (if semi-public)
service.yourdomain.com {
    basicauth / user JDJhJDEwJGxqT...  //[HASHED Password]
    reverse_proxy 100.64.0.50:9000
}
Hash your password using:
caddy hash-passwordConclusion This method enables secure, low-friction access to your #homelab services without exposing your LAN, relying only on tools that do one thing and do it well.